Taxi & Before Takeoff
The AH-64 may perform hover taxi (<25 feet and <20 knots) or air taxi (<100 feet and/or >20 knots) operations like any other helicopter, but ground taxi is typically used when feasible. Ground taxi allows the aircraft to be re- positioned away from other aircraft and ground support equipment using a lower power setting, which minimizes the rotor wash effects on the aircraft surroundings. This prevents foreign object damage to other aircraft, blowing dust/snow, and allows ground personnel to continue operations on the flight line with minimal disturbance.
The AH-64 uses a free-rotating tail wheel to facilitate taxi maneuvers on the flight line, which can be selectively locked to the rear position by either crewmember. Steering control is provided by tail rotor thrust, controlled by the anti-torque pedals within the cockpit. As such, it is advisable that the aircrew keep the tail wheel locked until aircraft movement has been initiated and the aircraft is clear of personnel and equipment. This allows the crewmember on the controls to better ascertain the appropriate pedal positions that are required to prevent the tail from adversely swinging to either side after the tail wheel is unlocked.
Before Taxi
Prior to initiating ground taxi, perform the following:
- PLT / CPG Chocks removed – Verify with ground personnel.
- PLT / CPG Bleed Air – On (UTIL page).
- PLT / CPG ANTI-ICE – As required (UTIL page).
- PLT EXT LT panel – Verify NAV lights are set in accordance with local procedures, ANTI-COL – WHT for day or RED for night, FORM knob set as appropriate.
- PLT & CPG Searchlight – As required.
- PLT PARK BRAKE – Release by applying wheel brake pressure; ensure PARK BRAKE handle is inward.
Ground Taxi
NVS mode or the searchlight may be used to assist with ground taxi under low-light conditions, or a combination of both. Ground taxi is typically performed in the following manner:
- Select Transition symbology mode (Symbology Select switch – Forward).
- Press and hold the force trim (Force Trim/Hold Mode switch – Forward).
-
With the cyclic in the neutral position, increase the collective to 27-30%.
Note
Additional collective (30-35%) may be necessary to initiate ground taxi movement when the aircraft is at a high gross weight and/or at a location with a high density altitude.
-
Apply forward cyclic to begin taxi movement. Use left/right pedal inputs as necessary to maintain heading and left/right cyclic inputs to maintain a level fuselage attitude. Ensure the aircraft is clear of personnel and equipment before unlocking the tail wheel. The force trim may be held throughout this maneuver as desired, or it may be released and pressed intermittently as necessary.
Note
The Horizon Line within the HDU Flight symbology may be used as a reference for a level fuselage attitude. The Skid/Slip Indicator should not be used as a reference as it will not indicate a level fuselage attitude while the aircraft is performing a turn.
-
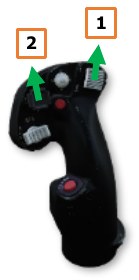
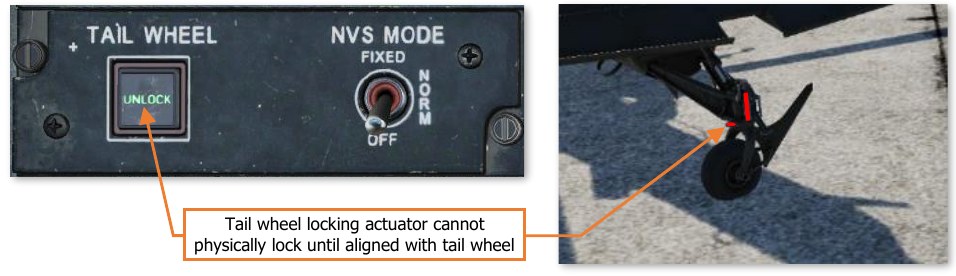
Prior to initiating a turn when ground taxiing, ensure the tail wheel is unlocked (“UNLOCK” light is illuminated on the TAIL WHEEL button). Either crewmember may unlock the tail wheel, but as a common practice the crewmember on the controls will command tail wheel lock/unlock using the Tail Wheel Lock/Unlock button on the Collective Flight Grip.
- Apply pedal in the intended direction of the turn while applying cyclic input in the same direction to maintain a level fuselage attitude. Apply left/right pedal inputs using an alternating sequence of “pressure/counter- pressure” on the pedals to maintain a constant and controlled rate of turn.
-
Prior to stopping the ground taxi or lifting off the ground, ensure the tail wheel is locked (“UNLOCK” light is not illuminated on the TAIL WHEEL button). Once the tail wheel is locked, apply aft cyclic to decelerate the aircraft. When the aircraft has stopped, set the cyclic into the center position prior to lowering the collective. The wheel brakes may also be used to assist with stopping the aircraft.
Note
The “TAIL WHEEL LOCK SEL” and “TAIL WHEEL UNLK SEL” advisories on the EUFD indicate the commanded state of the tail wheel locking actuator as selected by the aircrew, but do not reflect whether the tail wheel is physically locked.
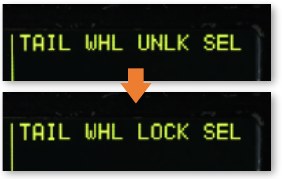
Only the “UNLOCK” light on the TAIL WHEEL button indicates whether the tail wheel is physically locked (“UNLOCK” light will extinguish when locked).
Tail wheel lock indication
During ground taxi, perform the following:
- PLT & CPG Wheel brakes – Check in each crew station by applying a slight amount of pressure against the toe brakes.
- PLT / CPG ENG page – Check; ensure NP and NR 101%, all indications green.
- PLT / CPG FLT page – Check; update altimeter if necessary.
- PLT Pilot standby instruments – Check; update altimeter if necessary.
Before Takeoff
Perform the following prior to lifting up to a hover or initiating takeoff from the ground:
-
PLT & CPG Weapons systems – Check the following:
-
A/S button – “SAFE” light is illuminated. (see Armament Panel for more information.)
-
GND ORIDE button – Off; “ON” light is not illuminated. (see Armament Panel for more information.)
-
Weapons not actioned – Verify. (see HMD High Action Display for more information.)
- PLT / CPG TAIL WHEEL button – Verify locked; “UNLOCK” light is not illuminated.
- PLT PARK BRAKE – As desired (Ensure released unless operating on uneven or sloped terrain).
- PLT & CPG POWER levers – Ensure both POWER levers are set to FLY.
-
PLT / CPG Systems – Check as follows:
-
FUEL page – Verify options set as appropriate.
- XFER – AUTO.
- BOOST – OFF.
- XFEED – NORM.
- Fuel quantity – Check; verify sufficient fuel is onboard the aircraft for the mission.
- EUFD – Check; clear of Warnings and Cautions.
-
Engine and flight instruments – Check.
- NP/NR 101%, all indications green.
- Update altimeter as required on FLT SET page and Pilot’s Standby Altimeter.
-
ASE – As required.
- Avionics – As desired (COM/TSD pages).
- Transponder – NORM; verify correct modes are enabled and codes are set for the mission.
- Communications – As appropriate; verify on EUFD.
- Navigation – As appropriate; ensure desired Route or Direct destination is selected.
-
-
PLT Hover Power Check – Perform. (see Hover Power Check in the next section for more information.)